Back to the cones. In the past we have used milk jugs for killing cones. They work just as well for the most part. Sometimes I make the holes too big and every once in awhile a bird will drop through and fall into the gut bucket. Some of the birds are 'taller' than the milk jug cone and it doesn't remain as calm as I would like. Each time we process birds I've been trying to make improvements to our system and our equipment. This I suppose is this year's improvement. The following is a 'How to' of making a Killing Cone.

Supplies needed are:
Sheet Metal around 36"X20", I purchased two sheets at Home Depot for just under $8 each.
Paper Pattern measuring 34" on the top, 18" at the tallest point and 17" long on the bottom edge.
Tin Snips
A Pop Rivet Setter and short rivets at 3/16.
A drill with a bit at 3/16.
A hammer.
A pair of pliers.
And a Sharpie type marker.
I would also recommend a good pair of gloves or a box of band-aids. (You choose)

If you have or purchase a FLAT piece of sheet metal you are one skip ahead of me. The metal I purchased was rolled and it became a hassle on more than one occasion. So, if you are like me, roll your metal out flat, enlist someone to help you keep the metal from rolling up and lay your pattern on it. Use your marker to trace the perimeter of the pattern.
 You should end up with something like the above picture. Pardon the poor picture quality. I should have shut the flash off.
 Next use your tin snips to cut along the line you made with your marker. Just like grade school with cut and paste homework, except the edges of the metal are VERY sharp and we won't be pasting, we'll use rivets instead. If you have gloves and are comfortable working in them I would advise using them on this step. I hate gloves, I feel like I have cartoon character hands. I didn't use gloves, instead used a couple of band-aids. My family chuckled at me the most during this step. The first cone I made already has blood on it. I tossed the scrap pieces of metal but I would love to figure out a way to use them if anyone has any ideas. Jolene already mentioned Ninja throwing stars.
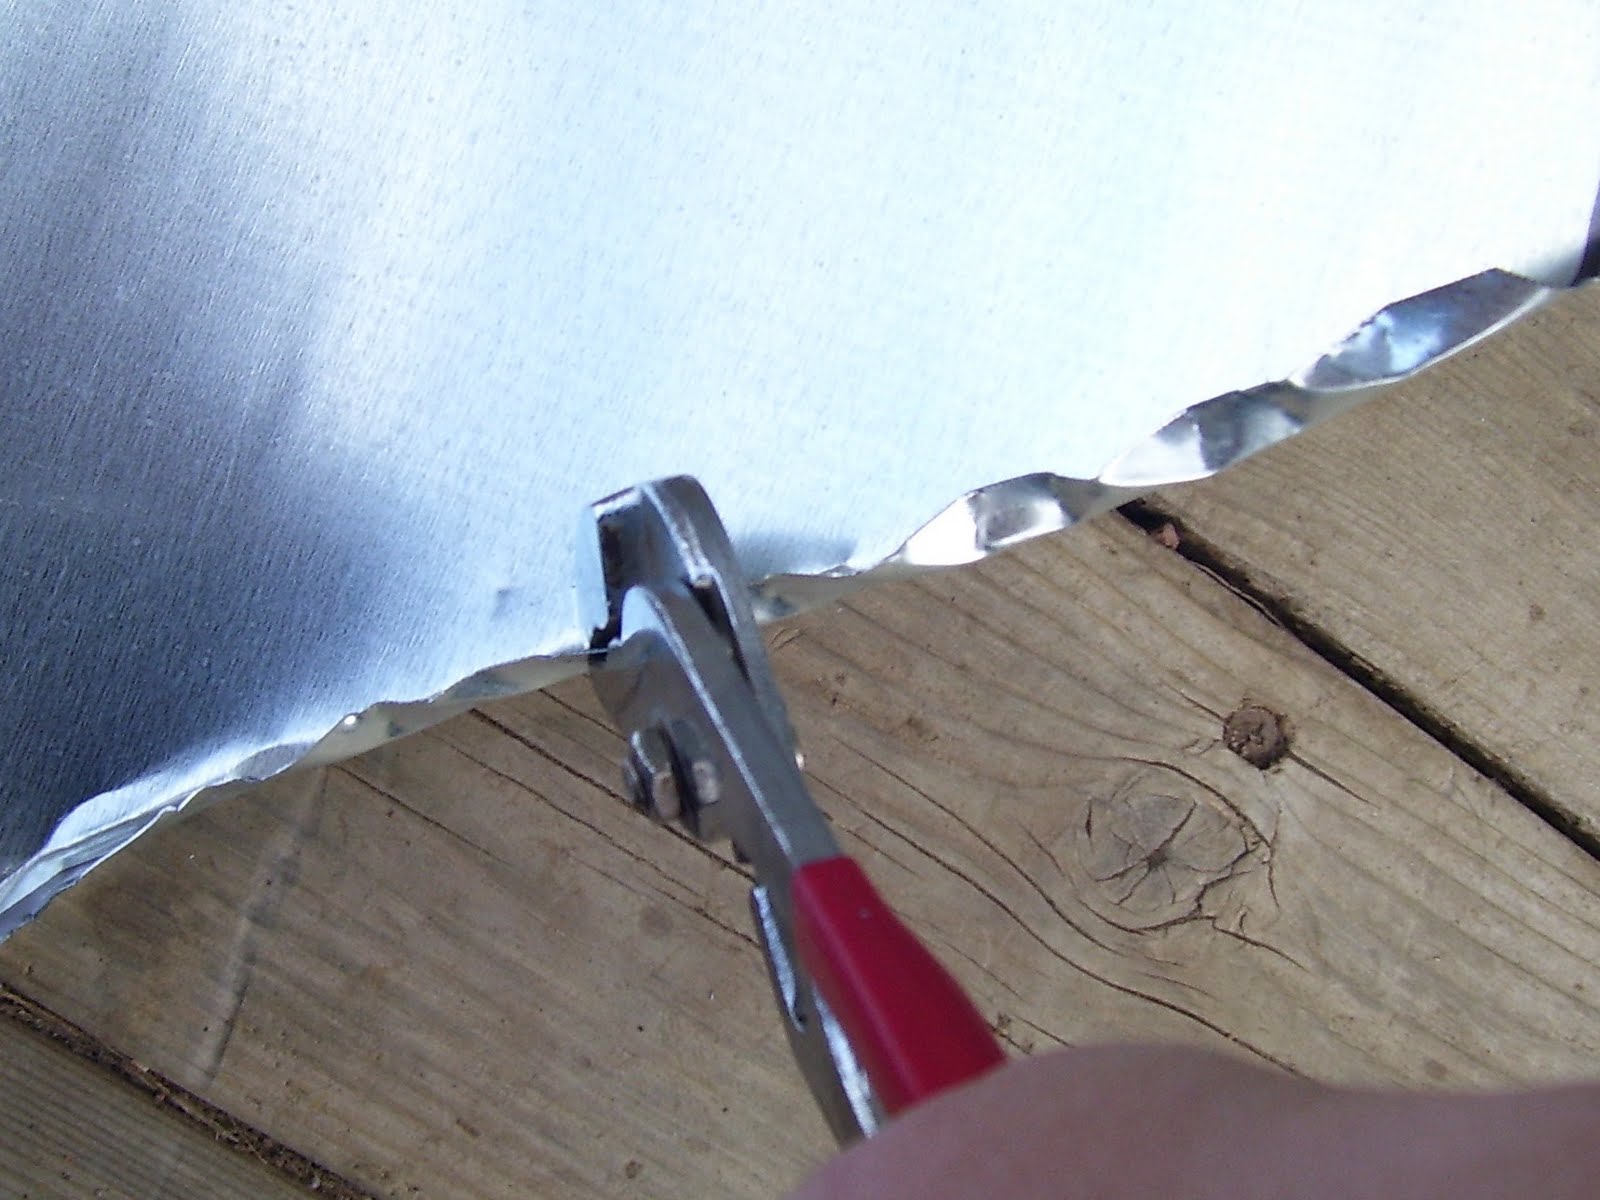
Next I used the pliers and folded up about a 1/4" to 1/2" around the perimeter of the cut out piece of metal. My metal wanted to remain in it's natural state of ROLLED! I cut my knee trying to hold it down while folding up the edges. Safety first!

Use your hammer to flatten the edges. Now there won't be so many sharp edges.

Now roll the metal to make a cone shape. Of course if you purchased metal already rolled, it will try to roll up on you throughout every step except this one. Now it will attempt to remain FLAT. Measure the diameter of the opening at the smaller end of the cone. You want this to be around 3" to 4". This is the hole the chickens head will poke through. Mark a spot for a hole. Carefully drill through both layers of metal with your 3/16" bit. Shelly helped me as it was hard to hold the metal in the correct shape and drill at the same time. While making the first cone, I cautioned her to watch her thumb as it seemed close to the spinning bit to me. No sooner had I said that, and she drilled the edge of her thumb. Don't worry about her though, she'll live. I may have a seizure because she won't stop talking about it, but she's okay.

Next place a rivet in the hole and attach the two layers of metal. Repeat the process for 3 or 4 more holes and rivets, extending the length of the cone. I drilled the first one and attached it with the rivet and then adjusted my cone before the other three. The wide openings of my cone are approximately 9" -11". These cones will work great for my broilers but I'll have to make larger ones for the turkeys.

When you are all done you will end up with a cone shaped piece of metal. All ready for your chickens. If you edges don't match up you can trim up the cone with your tin snips or just fold over the extra. I folded over, I didn't want to try and pound down the rough edges.


I used BC (Blind Chicken) as example before I set the rivets on my first cone. She fit great. I gave her some leftover pasta as a thank you for helping me out.
So there it is! Simple and easy! I'm sure all my cuts will heal by the time the broilers are ready for processing. Shelly will eventually quit talking about how she drilled a hole in her thumb. For the record, there is no hole it was just the edge. Rest assured though, for those of you that come to our Pluckin' Party, you will get a greatly exaggerated story of the thumb drilling. I can hardly wait! I think Beer Can Chicken on the BBQ will be in order!
Can hardly wait to try out your new system! :)
ReplyDeleteExcellent blog, as always!
You amaze me, Dawn. Thank you for sharing your philosophy on food preparation and your creative ideas for getting the job done humanely and efficiently. I am inspired.
ReplyDelete